The Science of Succulence: Why Beer Can Chicken Works Perfectly
There are culinary methods that are steeped in tradition, and then there are those that simply revolutionize the way we cook. Beer can chicken, a beloved BBQ staple, often falls into the latter category. What might seem like a quirky grilling gimmick at first glance is, in fact, a brilliantly engineered technique that consistently delivers an unparalleled combination of incredibly juicy meat and perfectly crispy skin. This isn't just a party trick; it's a testament to applied culinary science, making it a go-to for both seasoned pitmasters and backyard grilling novices alike.
This comprehensive guide will delve deep into the scientific principles that make beer can chicken a fail-safe path to barbecue perfection. We'll explore how simple elements combine to create a moist, flavorful, and evenly cooked bird every single time, ensuring your next cookout is a resounding success.
The Ingenious Science Behind the Juiciness and Crispiness
At the heart of beer can chicken's magic lies a two-pronged scientific approach: vertical roasting and internal steaming. These elements work in concert to transform a humble whole chicken into a culinary masterpiece.
Vertical Roasting: Even Cooking and Crispy Skin
Positioning the chicken upright on a partially full can of beer is more than just visually impressive; it's a strategic move for optimal cooking. Here's why:
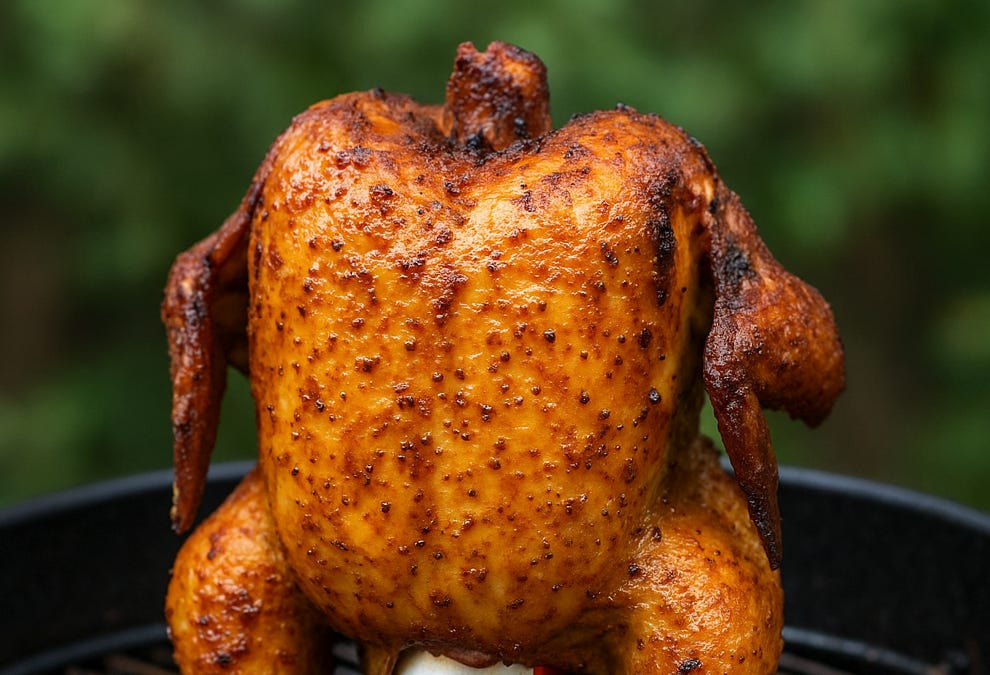
- Even Heat Circulation: When a chicken lies flat, parts of it (like the underside) are often shielded from direct heat, leading to uneven cooking. Standing it vertically allows heat to circulate freely and uniformly around the entire bird. This ensures that all surfaces, from the breast to the thighs and wings, are exposed to consistent temperatures, promoting even cooking and browning.
- Optimal Fat Rendering: As the chicken cooks vertically, excess fat naturally drips away. This not only contributes to a healthier finished product but, more importantly, prevents the skin from becoming greasy and promotes maximum crispiness. The fat collects in a drip pan below, preventing flare-ups on the grill.
- Uniform Skin Crisping: With heat circulating all around, the skin crisps up beautifully and evenly across the entire surface, developing that irresistible golden-brown hue and satisfying crunch that every chicken lover craves.
Internal Steaming: The Secret to Unrivaled Moisture
This is where the "beer can" truly shines. As the can heats up within the chicken's cavity, the liquid inside begins to boil, producing steam. This steam serves several vital functions:
- Infusion from the Inside Out: The hot steam permeates the chicken's meat from its core, effectively basting it from the inside. This constant influx of moisture prevents the meat from drying out, even during extended cooking times at high temperatures. The result is incredibly tender, succulent meat that practically melts in your mouth.
- Temperature Regulation: The presence of steam inside the cavity also helps to moderate the internal temperature of the chicken, contributing to a more even cook and reducing the risk of overcooking delicate breast meat while waiting for the thighs to finish.
- Flavor Contribution (Subtle but Present): While the beer itself doesn't significantly imbue the meat with a strong beer flavor, the aromatics from the brewing process do contribute a subtle depth and complexity to the overall taste profile. It's more about the moist environment it creates than an overt beer flavor. The aluminum can acts as both a stable base and an efficient steam vessel.
Prepping for Perfection: Setting the Stage for Success
Achieving legendary juicy meat and crispy skin with beer can chicken starts long before it hits the grill. Proper preparation is key to unlocking its full potential.
Choosing Your Chicken and Liquid
- Chicken Selection: Opt for a fresh, whole chicken weighing between 3.5 and 5 pounds. This size fits perfectly over a standard beer can and cooks evenly. Look for one with intact skin, as this helps retain moisture. Always pat the chicken thoroughly dry with paper towels before seasoning; this is a crucial step for achieving crispy skin.
- The "Beer" in Beer Can Chicken: While a classic lager or ale is traditional and provides excellent steaming results, don't feel limited. Fuller-bodied beers tend to produce more moisture than light beers. However, you can absolutely experiment with other liquids for different flavor profiles. Try chicken broth, hard cider, sparkling wine, or even a can of soda (cola adds a surprising sweetness and caramelization). For an extra aromatic kick, consider adding garlic cloves, bay leaves, or fresh herbs like rosemary and thyme directly into the can with your chosen liquid.
Crafting the Perfect Seasoning Blend
The seasoning blend is where much of your chicken's external flavor and crust will develop. A good dry rub typically includes a balance of salt, sugar (for caramelization), and various spices. Common ingredients include paprika, garlic powder, onion powder, cayenne pepper, black pepper, and chili powder. Before applying your rub, lightly coat the chicken with olive oil. This helps the seasonings adhere better and further promotes that coveted crispy skin.
Essential Equipment for Grilling
Whether you're using a charcoal or gas grill, the principle of indirect heat is paramount. This means the heat source should not be directly under the chicken. For charcoal grills, bank the coals to the sides. For gas grills, light the outer burners and leave the center burner off. An essential piece of equipment is a sturdy drip pan placed directly under the chicken to catch rendered fat and prevent dangerous flare-ups that can char your bird.
Mastering the Cook: Temperature, Timing, and Safety
Executing the cook with precision ensures the best results. Whether you're opting for the grill or an oven, understanding the nuances of temperature and doneness is crucial for foolproof beer can chicken.
Consistent Temperature Control
Maintain a consistent grill temperature of 350-375°F (175-190°C) throughout the cooking process. This range is ideal for ensuring the chicken cooks through without drying out, while still allowing the skin to crisp beautifully. Avoid the temptation to frequently open the grill lid; every peek releases precious heat and extends cooking time.
Proper Positioning and Doneness
Carefully place the chicken over the can, ensuring it stands stably, with the chicken's legs forming a natural tripod with the can. Cook until the internal temperature reaches 165°F (74°C) in the breast and 180°F (82°C) in the thigh, measured with a reliable meat thermometer. Always insert the thermometer into the thickest part of the meat, avoiding bone. The skin should be a rich golden brown and wonderfully crispy.
The Art of Resting and Safe Handling
Once cooked, gently remove the chicken (still on the can) from the grill and let it rest on a cutting board for 10-15 minutes. This crucial step allows the juices to redistribute throughout the meat, ensuring every bite is moist and flavorful. Be extremely careful when removing the chicken from the can after resting, as the can and its contents will still be very hot. Use tongs or heat-resistant gloves and dispose of the can and liquid safely.
Beyond the Basics: Unleashing Your Inner Chef
While a traditional spice-rubbed beer can chicken is undeniably delicious, the technique itself is incredibly versatile. Once you've mastered the fundamentals, feel free to experiment and make it your own.
- Flavorful Rubs: Explore different spice profiles. Think smoky chipotle rubs, herbaceous blends with rosemary and thyme, or even a spicy jerk seasoning.
- Exotic Liquids: Beyond beer and broth, consider Asian-inspired liquids like sake with a paste of miso, mirin, and soy sauce rubbed onto the chicken. The possibilities are endless.
- Oven Roasting: Don't have a grill? Beer can chicken can be successfully made in an oven. Place the chicken-and-can assembly in a roasting pan to catch drips. You can even purchase dedicated stainless-steel vertical roasting stands that mimic the can's effect without needing the actual can, offering a clean, reusable alternative.
- Brining: For an extra layer of moisture insurance, consider brining your chicken for a few hours before applying the rub. This helps the meat retain even more moisture during cooking.
Conclusion
Beer can chicken is far more than a novelty; it's a testament to how simple scientific principles can elevate a dish from good to extraordinary. The combination of vertical roasting for even cooking and fat rendering, coupled with internal steaming for unparalleled moisture, creates a chicken that is consistently juicy on the inside and perfectly crispy on the outside. By understanding the science and following these practical tips, you're not just cooking a chicken; you're mastering a technique that promises delicious, crowd-pleasing results every time. So, grab your favorite brew (or preferred liquid), fire up the grill, and prepare to embark on a journey to the science of succulence!
