Master Beer Can Chicken: Juicy Meat, Crispy Skin Every Time
There are few culinary delights as satisfying as a perfectly roasted chicken – succulent, fall-off-the-bone meat encased in a golden, shatteringly crispy skin. For generations of barbecue enthusiasts and home cooks alike, the quest for this ideal has led to countless techniques. Among them, one stands out for its ingenious simplicity and consistently spectacular results: beer can chicken. Far from a mere novelty, this method is a proven powerhouse that transforms an ordinary whole chicken into a culinary masterpiece, delivering incredibly juicy meat and a skin so crisp it crackles with every bite.
Whether you’re a seasoned grill master or taking your first steps into the world of backyard barbecue, mastering beer can chicken is an achievable goal that promises significant rewards. Forget dry, bland poultry; this technique ensures a self-basting, flavor-infused experience that will have your family and friends clamoring for more. Let’s dive into the science, the setup, and the secrets to achieving barbecue perfection every single time.
The Magic Behind the Method: Why Beer Can Chicken Works
The brilliance of beer can chicken lies in its unique combination of vertical roasting and internal steaming, creating an almost foolproof environment for optimal cooking. It’s a fascinating dance between heat and moisture, orchestrated by a humble can of beer.
- Internal Steam Infusion: As the beer in the can heats up, it produces steam. This steam rises into the cavity of the chicken, infusing the meat from the inside out with moisture. This internal basting is the primary reason why beer can chicken is so exceptionally juicy, preventing the meat from drying out even under high heat. While the beer itself doesn't significantly impart its flavor directly to the meat (a common misconception), the *moisture* it provides is absolutely critical.
- Vertical Roasting for Evenness: The vertical position is a game-changer. By standing the chicken upright, heat circulates more effectively and evenly around the entire bird. This ensures that the breasts and thighs cook uniformly, avoiding the common pitfall of one part being overcooked while another is still undercooked. Furthermore, this orientation allows excess fat to drip away freely, leading to a leaner, more flavorful bird.
- Crispy Skin Development: With fat dripping away and heat circulating unimpeded, the chicken's skin has ample opportunity to dry out and crisp up beautifully. Unlike horizontal roasting where the bottom skin can become soggy, vertical roasting exposes all surfaces to the radiant heat, resulting in that coveted golden-brown, crunchy exterior that makes beer can chicken so irresistible.
- Self-Basting Environment: The combination of internal steaming and external fat rendering creates a continuous self-basting cycle. The skin benefits from the consistent exposure to heat, while the meat remains moist thanks to the internal steam.
For a deeper dive into the technicalities of this remarkable cooking process, explore The Science of Succulence: Why Beer Can Chicken Works Perfectly.
Essential Ingredients & Preparation: Setting the Stage for Flavor
While the technique is key, the right ingredients and a little preparation lay the foundation for truly unforgettable beer can chicken. Precision in these early steps ensures maximum flavor and optimal texture.
Choosing Your Chicken and Beer
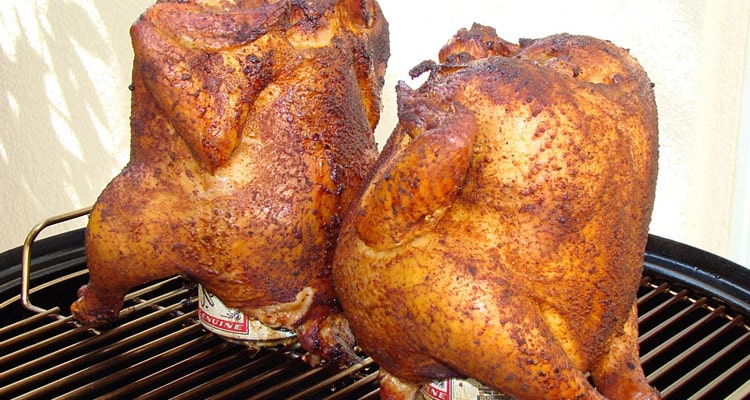
- The Chicken: Start with a fresh, whole chicken weighing between 3.5 and 5 pounds. This size is ideal for fitting over a standard 12-ounce beer can and cooks evenly within a reasonable timeframe. Look for a chicken with intact skin and no tears, as this helps to seal in moisture during the cooking process. Pat the chicken thoroughly dry with paper towels before seasoning – this is crucial for achieving crispy skin.
- The Beer: While any beer will technically work, fuller-bodied lagers, ales, or even stouts often yield slightly better results due to their higher moisture content and more complex aromatics. Avoid overly light or flavored beers that might introduce unwelcome notes. You'll only use about half the can, so take a celebratory sip (or two!) before you get cooking. Beyond beer, don't be afraid to experiment! Broth, wine, or even a mixture of water with aromatics like lemon slices, garlic cloves, or herbs can provide the necessary steam. For a truly unique twist, consider a Japanese-inspired version using sake in the can with a rub of miso, mirin, and soy paste.
The All-Important Rub and Application
The seasoning blend is where much of the external flavor of your beer can chicken will come from. A classic smoky-sweet dry rub adds wonderful complexity, but the possibilities are endless.
- Basic Dry Rub: A great starting point includes paprika (smoked for extra depth), brown sugar, salt, black pepper, garlic powder, and onion powder. Adjust ratios to your preference – more sugar for a sweeter bark, more chili powder for a kick.
- Application Technique: For maximum adhesion and to promote crispy skin, first lightly coat the entire chicken with a thin layer of olive oil or even melted butter. This acts as a binder for your rub and helps render the skin to a golden crisp. Then, generously apply your chosen rub, making sure to get into all the nooks and crannies, including under the wings and legs. Don’t forget to season the cavity if you’re not filling it with aromatics.
- Experimentation: Feel free to explore. Try a zesty lemon-herb rub, a spicy Cajun blend, or a robust rosemary and garlic mix. The beauty of beer can chicken is its adaptability.
Mastering the Cook: Grill, Oven, and Temperature Control
Whether you prefer the smoky char of a grill or the consistent heat of an oven, beer can chicken can be successfully achieved using either method. The principles of indirect heat and temperature control remain paramount.
Grill Setup for Success
For grilled beer can chicken, indirect heat is non-negotiable. This means the heat source should not be directly beneath the chicken, preventing scorching and promoting even cooking.
- Charcoal Grills: Bank your lit coals to one or both sides of the grill, leaving the center clear. Place a drip pan in the center directly under where the chicken will sit.
- Gas Grills: Turn on the outer burners to medium-low, leaving the center burner off. Place a drip pan in the center beneath the cooking grate.
- Temperature: Aim for a consistent grill temperature of 350-375°F (175-190°C). Use your grill's built-in thermometer, or better yet, a reliable external grill thermometer for accuracy.
- Positioning: Carefully place the prepared chicken over the half-full beer can, ensuring it stands stably. The legs, splayed out, should form a sturdy tripod with the can, providing balance.
Oven Roasting
Don't have a grill? No problem! Grill or Oven: Foolproof Beer Can Chicken for Ultimate Juiciness, the oven method is just as effective for producing a wonderfully juicy bird with crispy skin. Preheat your oven to 375°F (190°C). Place the chicken on the beer can in a sturdy roasting pan or on a dedicated vertical roasting stand. The roasting pan will catch any drips, preventing a mess. The cooking time will be similar to grilling.
Crucial Temperature and Doneness
Patience and precision are key to perfectly cooked chicken. The cooking time for a 4-5 pound chicken is typically 1.5 to 2 hours, but always rely on internal temperature, not time.
- Monitoring Doneness: The chicken is done when an instant-read meat thermometer inserted into the thickest part of the breast (avoiding the bone) registers 165°F (74°C), and the thickest part of the thigh (again, avoiding the bone) reaches 175-180°F (79-82°C). While the breast is safe at 165°F, thighs often benefit from a slightly higher temperature for optimal tenderness and flavor.
- Resist the Urge to Peek: Every time you open the grill or oven lid, you lose heat, extending the cooking time and potentially affecting the crispness of the skin. Trust your thermometer.
- Visual Cues: Beyond temperature, look for a deep golden-brown, crispy skin. The juices should run clear when the thigh is pierced.
Safety First & Perfect Presentation
While beer can chicken is a fantastic cooking method, there are a few important safety considerations to keep in mind, especially when handling the finished product.
Handling the Hot Can
The beer can and its contents will be extremely hot when you remove the chicken from the grill or oven. Use sturdy, heat-resistant barbecue gloves or oven mitts. A safe way to remove the chicken is to use tongs to grasp the can while a second set of tongs or a carving fork helps lift the chicken off. Alternatively, you can carefully tip the chicken and can into a large pan or platter, then use tongs to separate the bird from the can once it’s stable.
The Importance of Resting
Once removed from the heat, allow the beer can chicken to rest for 10-15 minutes before carving. Tent it loosely with foil. This crucial step allows the juices to redistribute throughout the meat, ensuring every bite is as moist and flavorful as possible. Skipping this step often results in juices pooling on your cutting board instead of remaining in the chicken.
Carving and Serving
After resting, carefully remove the can. The chicken should easily slide off. Carve your chicken as you would any roasted bird – separating the legs and thighs, then slicing the breast meat. Serve your masterpiece with your favorite sides: creamy mashed potatoes, grilled vegetables, a fresh salad, or fluffy rice pilaf. The juicy meat and crispy skin of your homemade beer can chicken will be the star of any meal.
Conclusion
Mastering beer can chicken is more than just learning a recipe; it's about understanding a technique that consistently delivers an unparalleled experience of juicy, flavorful meat and irresistibly crispy skin. By appreciating the science of vertical roasting and internal steaming, selecting the right ingredients, and adhering to proper cooking temperatures, you'll unlock a barbecue secret that will impress everyone at your table. So grab a chicken, crack open a can of your favorite brew, and get ready to transform your backyard into the ultimate destination for delicious, perfectly cooked poultry. Happy grilling (or roasting)!
